
How to Read and Understand Crane Load Charts
A crane load chart shows the maximum rated load a crane can lift under a specific configuration and working radius. To read one correctly, identify the correct chart, match the crane setup, find the working radius, and then read the corresponding rated capacity.
The chart may account for the boom length, boom angle, counterweight, outrigger position, fly jib, reeving and hook block arrangement. Because these conditions affect rated capacity, a crane's headline tonne rating does not apply to every lifting position.
Key Takeaways
- A crane load chart gives rated capacity for a particular crane configuration and lifting condition.
- Working radius is a key value because the available lifting capacity generally decreases as the radius increases.
- The chart must match the crane's actual boom, counterweight, outriggers, attachments and other specified conditions.
- Hook blocks and lifting gear may need to be accounted for separately, depending on the manufacturer's instructions.
- A load chart shows lifting capacity, while a working range diagram shows reach and height.
- The manufacturer's load chart, notes and operating instructions take priority over general rules.
What Is a Crane Load Chart?
A crane load chart is a manufacturer-provided rated capacity chart that shows how much load a crane is permitted to lift under specified operating conditions.
Safe Work Australia provides guidance on crane load charts and explains that the applicable rating depends on the crane's configuration and operating conditions.
For a
mobile crane, the chart can include information about:
| Load chart item | What it tells you |
|---|---|
| Working radius | The distance used to determine the rated capacity for the lifting position |
| Boom length | The main boom configuration being used |
| Boom angle | The boom position where angle is part of the rated configuration |
| Counterweight | The counterweight arrangement required for the stated capacity |
| Outriggers | The outrigger position or extension the rating applies to |
| Fly jib or attachment | Whether additional boom equipment is fitted and in use |
| Reeving | The rope arrangement and number of falls where specified |
| Hook block | The hook arrangement and whether it is included or excluded |
| Operating mode | Conditions such as stationary lifting or pick-and-carry operation |
The exact layout and terminology vary between crane manufacturers and models. Safe Work Australia states that a load chart should contain enough information to identify the crane configuration to which it applies.
What Is Working Radius on a Crane Load Chart?
Working radius is the horizontal distance used to determine the crane's rated capacity for a particular lifting position.
As the working radius increases, the crane will generally have less available lifting capacity. The exact reference points and measurement method depend on the crane manufacturer's specifications.
What Does Boom Length Mean?
Boom length is the length of the main boom in the configuration being used.
A longer boom can provide greater reach, but it does not automatically mean greater lifting capacity. The applicable rating depends on the complete crane configuration and working radius.
Why Do Counterweights, Outriggers and Attachments Matter?
They form part of the configuration for which the load chart provides a rating.
A chart may specify a particular counterweight arrangement, outrigger extension or fly jib configuration. Using a different setup can mean that the listed capacity no longer applies.
Safe Work Australia specifically identifies counterweight, fly jib and outrigger configuration as information that may need to be identified on a load chart.
Why Do Hook Blocks and Reeving Matter?
The hook block and rope arrangement can also affect how a load chart applies.
The manufacturer's documentation may specify the number of rope falls, the hoist being used, and whether the hook block is included or excluded from the stated capacity.
How Do You Read a Crane Load Chart?
The exact format varies, but the process is based on matching the
actual crane configuration and working radius to the corresponding capacity.
1. Identify the Correct Load Chart
Start by confirming the crane manufacturer, model and configuration.
Check the information shown on the chart for the boom arrangement, counterweight, outriggers, attachments, reeving and operating mode.
SafeWork NSW notes that operators need to understand the crane's limitations and how to read the load chart for the relevant configuration.
A crane can have more than one load chart, particularly where different boom or fly jib configurations are available.
2. Determine the Working Radius
Find the working radius for the planned lifting position.
For example, if the relevant radius is 10 metres, locate the 10-metre value on the chart using the manufacturer's specified method for determining radius.
The radius should be considered for the lifting position being assessed because the crane's rated capacity changes across its working range.
3. Match the Boom Configuration
Find the boom length or configuration that corresponds to the actual crane setup.
Depending on the manufacturer, boom lengths may appear across the top of a table, in separate tables or in another chart format.
The relevant capacity is the value associated with the correct configuration and radius.
4. Read the Rated Capacity
Locate the rated capacity for the selected configuration and radius.
A simplified example could look like this:
| Working radius | Rated capacity |
|---|---|
| 5 m | 20 t |
| 10 m | 12 t |
| 15 m | 7 t |
| 20 m | 4 t |
In this simplified example, a 15-metre working radius corresponds to a rated capacity of 7 tonnes.
Real crane load charts can contain multiple configurations, restrictions and chart notes. Do not automatically round or interpolate between chart points unless the manufacturer's instructions specify how to handle values between listed points.
5. Read the Chart Notes and Symbols
The numbers are only part of the load chart.
Notes, legends, symbols and shaded areas can specify conditions such as:
- Outrigger requirements
- Counterweight configuration
- Fly jib configuration
- Hook block treatment
- Reeving
- Hoist selection
- Operating restrictions
These conditions form part of the rated capacity information and should be read together with the capacity figures.
How Does Hook and Rigging Weight Affect Crane Capacity?
The weight of the load itself may not be the only weight that needs to be considered.
Depending on the manufacturer's instructions, the suspended load calculation may also need to account for equipment such as the hook block, slings, lifting beams or spreader beams.
Safe Work Australia gives the example of a crane rated at 20 tonnes at a particular radius where the hook and lifting gear have a combined mass of 1 tonne. In that case, the load itself cannot exceed 19 tonnes.
The exact treatment of hook and lifting gear depends on the manufacturer's load chart and instructions.
Crane Load Chart Example
Suppose a mobile crane needs to lift an 8-tonne load at a 12-metre working radius.
The crane has a specified boom configuration, counterweight and outrigger setup.
The operator first selects the load chart that matches that configuration.
They then locate the 12-metre working radius and find the rated capacity for the applicable boom configuration.
Assume the chart gives a rated capacity of 10 tonnes and the manufacturer's instructions require 1 tonne to be allowed for the hook and lifting gear.
The remaining capacity would be 9 tonnes, so the 8-tonne load would fall within the simplified example's rated capacity.
For an actual lift, the manufacturer's load chart and operating instructions must be used.
Why Does Crane Capacity Change With Working Radius?
Crane capacity generally decreases as working radius increases because the crane's loading and stability conditions change.
Safe Work Australia's guidance states that lifting capacity is generally limited by structural strength at smaller working radii and stability at greater working radii, while also noting that structural limits can apply across the working range.
This is why a crane's nominal tonne rating should not be treated as its capacity at every lifting position.
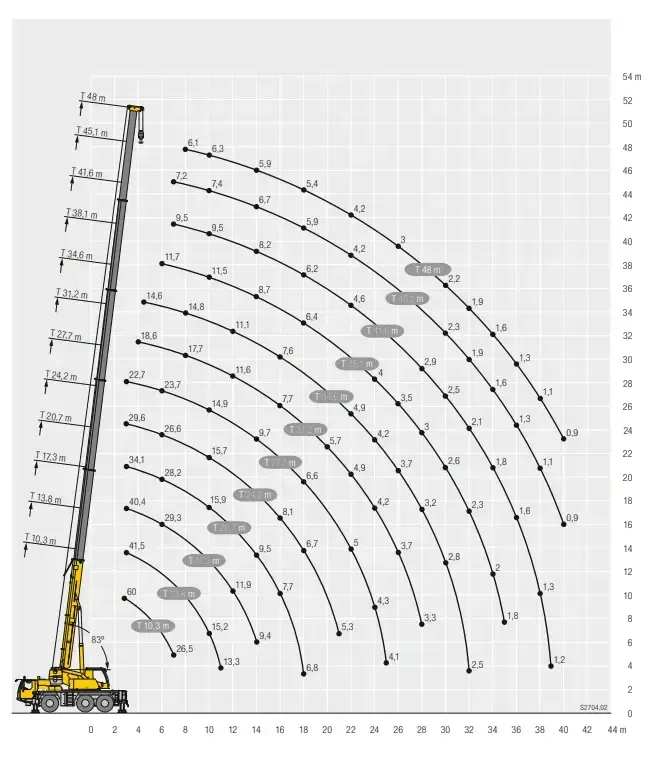
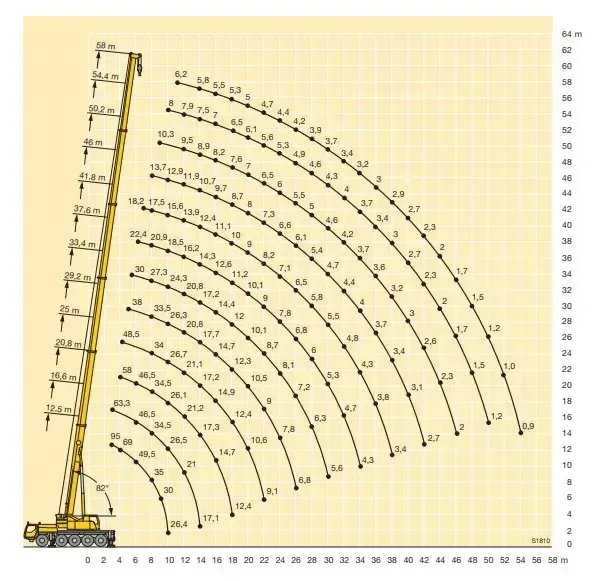
How Do You Read a Crane Working Range Diagram?
A working range diagram shows the crane's reach and lifting envelope, while a load chart shows its rated lifting capacity.
A working range diagram may show:
- Working radius
- Lifting height
- Boom length
- Boom angle
- Maximum reach
For example, if a load needs to be placed 20 metres away and 15 metres above ground, the working range diagram can help show whether the crane can physically reach that position.
The load chart is then used to determine the rated capacity for the required configuration and radius.
Crane Load Chart vs Working Range Diagram
| Crane load chart | Working range diagram | |
|---|---|---|
| Main purpose | Shows rated lifting capacity | Shows the crane's working envelope |
| Main information | Capacity for a configuration and radius | Reach and lifting height |
| Main question | How much can the crane lift? | How far and how high can it reach? |
Common Misconceptions About Crane Load Charts
"A 50-tonne crane can lift 50 tonnes anywhere."
No. The nominal tonne rating does not represent the crane's capacity at every radius or configuration. The applicable load chart determines the rated capacity.
"A longer boom always means less lifting capacity."
Not as a universal rule. Boom length affects the crane's configuration, but the actual rated capacity depends on the crane model, configuration and working radius.
"The highest number on the chart is the usable capacity for every lift."
No. A capacity figure only applies to the configuration and conditions associated with that part of the chart.
"All crane load charts use the same colours and symbols."
No. Manufacturers can use different layouts, legends, symbols and shading. The specific chart's notes and legend should be followed.
"The load weight is the only weight that matters."
Not necessarily. Hook blocks and lifting equipment may also need to be included or deducted according to the manufacturer's instructions.
"A working range diagram tells me how much the crane can lift."
No. A working range diagram primarily shows reach and height. The load chart provides the rated lifting capacity.
"The Same Load Chart Applies to Every Crane Configuration"
No. The applicable load chart can change with the crane's configuration and operating conditions. SafeWork NSW's mobile crane guidance provides information on mobile crane operation and the importance of following the manufacturer's requirements for the crane being used.
Always make sure the load chart matches the crane's actual configuration.
Frequently Asked Questions
What is a crane load chart?
A crane load chart is a manufacturer-provided rated capacity chart showing how much a crane can lift under specified configurations and operating conditions.
How do you read a load chart for a crane?
Identify the correct chart, confirm the crane configuration, determine the working radius, match the applicable boom configuration and read the corresponding rated capacity.
What is the most important value on a crane load chart?
The relevant value is the rated capacity that applies to the actual crane configuration and working radius. There is no single capacity figure that applies to every lift.
Does crane capacity include the hook block?
It depends on the specific load chart. The manufacturer should state whether the hook block is included or excluded and whether deductions are required.
What is the difference between a load chart and a working range diagram?
A load chart shows rated lifting capacity, while a working range diagram shows reach, height and the crane's working envelope.
Can I use another crane's load chart?
No. The load chart needs to correspond to the crane and configuration being used. Even cranes with similar nominal capacities can have different rated capacities and operating limitations.
Need a Crane for Your Lift?
Understanding crane load charts is important when determining whether a crane has the required capacity for a planned lifting position.
BIGLIFT CRANES provides
mobile crane hire across Sydney, with a fleet from 16-tonne to 130-tonne mobile cranes, including City, All-Terrain and Franna cranes. BIGLIFT states that it assesses factors such as load weight, lift radius, lifting height, access and ground conditions when determining a suitable crane.
For a crane hire enquiry, provide the load weight, approximate working radius, lifting height and site details so the requirements can be assessed.
Contact BIGLIFT CRANES
for a crane hire quote.